Friday, April 13, 2012

Tea cakes

You'll need butter--that's the one ingredient you can't skimp on (and you'll pay a hefty price.  This package is the size of two sticks and costs around 65.000-75.000VND (20.000-25.000VND is one USD).  The original recipe calls for cream, but cream costs at least $2 for a TINY bottle here.  Buy whole milk instead.  While they taste different, they are still delicious.  (Be sure to purchase "Sữa tươi không có đường".)  Most milk in Vietnam is sold with sugar!

Cream one stick of butter with one heaping cup of sugar.  My advice:  if you are buying french butter, don't try to soften it too long.  It melts quickly!  Use a fork!  If you can find sugar that's less grainy, your cookies will be better.


Mix with a fork until sugar and butter are well blended, then add one well beaten egg and mix again... Add one tablespoon or cream or milk.
 

Add flour slowly.  Two cups total.  Mix until all the excess flour is blended.  (You may need to rest your hand.  I don't know if an electric mixer would work as well as good old-fashioned mixing by hand.)


 You will probably need to use fork to get the dough out of the bottom of the bowl.  Make a ball.  Divide the ball into two equal bowls.  (One is too large to roll out).

Now, rolling out cookie dough turned out to be very good practice at rolling out pie crusts 


First, sprinkle a clean surface with flour.  Don't bother trying to spread it around with your hands yet.  If the surface is dry, you will just make the flour uneven.  Sprinkle one ball of dough with flour and set it down on the middle of the floured surface.  Begin to roll it out.  Roll it counterclockwise, like so:  roll over the ball once, turn your pin at a 45 degree angle, roll again, repeat.  Continue until the dough is halfway (or a little less) rolled out.  Now, for the secret to not having your dough stick to the table:


 Pick up the rolled dough, then sprinkle more flour onto the void.  Turn the dough over before you place it back on the table.  Now, all the flour from the bottom is on top!  Just use your hand to brush the flour around on the dough.  Keep rolling in the same counter-clockwise manner.


 When the dough begins to look slightly see-through, it's time to use your cookie cutter.  The original recipe says to roll the dough to 1/8th of an inch thick, and I might over do it.  These cookies are really great when they are crispy little crackers.  Ira's favorites are the ones that are almost burned.


You'll still need to be careful when you are transferring the cookies to the cookie sheet.  My secret to keeping the dough from sticking isn't a cure-all.  I usually remove the scraps first and make a ball with them before I tackle the delicate job of cookie transferring.


 The great thing about being done with the first roll-out is that the table is now moist from the dough and it is easier to flour evenly.  You can brush the excess flour back over the table with your hand and add more if you need to.


For sugar cookies, I've found that buttering the cookie sheet is a waste of an expensive product, makes the cookies look fried, and adds extra (unwanted) calories.  A baking mat is definitely an investment that will pay off!

Bake the cookies at 475 for 5 minutes.  You'll have to watch them closely!  My oven doesn't get that hot, so I had to bake mine at 320ish for 10-15 minutes (which might work better for people who can't hover over their stove for so long).


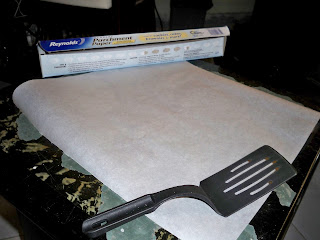
Thanks to my mother in law, I actually happened to have a roll of parchment paper on hand.  Since platters are in short supply for me, I just use parchment paper to cool my cookies.  Who needs a cooling rack? (...which, by the way, I never used or understood the point of...though I suppose there is one...)


I have discovered that the best way to clean the dough off of your table or counter (now, PLEASE don't do this to your expensive dining room table, as it might scratch it) is to use the cookie cutter to scrap all the dough and flour into the trash can.


Friday, March 2, 2012

Freeze/Prep

In the realm of cooking from scratch in a new country, there are few things as precious as time.  This idea of pre-preparing foods has saved me a ton.  One note of caution-make sure your electricity is fairly stable before using this(we initially tried this when we first moved to Hanoi- which was followed by a few days worth of blackout and spoiled food).  Our current residence rarely has power outages, but it is good to know before you waste more valuable time.

I have found you can do this with a wide variety of foods, but I am still experimenting.  I know for sure it works well with Potatoes, Carrots, and blanched and seeded tomatoes to be used for tomato sauce.

Start by washing your veggies.

Next, peel potatoes/carrots. Discard skin.
You should be left with something like this:

Next, cut the veggies into chunks of approximately the same size.(this can vary by your preference or what you plan to make with the veggies in the future)

I then take the cubed potatoes and put them in a steaming pot(just a pot with holes in the bottom for steam to pass through) and place it on top of the coordinating pot of boiling water.

Like so:

Place the lid on and let it steam for 15-30 min or until fork easily penetrates the veggies.  If you cook too long they will be mushy, but this could work if you plan to use them in a recipe where they have to be cooked that far, such as potato soup.

Once cooked I store the potatoes in zip-lock bags(not brand name because those are hard to find).  I generally write what is in the bag with sharpie as well as the date I prepped it.  This is helpful because once it is in the freezer some things start to look alike and that could make for some interesting creations by accident.

I then transfer the mostly cooked potatoes to the bags and allow most of the steam to escape with them open.  I usually only fill the bags half full due to the amount we would most often use for a recipe since there are only 2 of us, but you could probably fill to 3/4 full safely.

Next, you just squeeze out as much air as you can, seal the bags and fold over so that the label is on top.

 And now, finally, they take their place among other frozen veggies in the freezer(carrots at this time).

I find this helpful, especially with veggies that take longer to cook or that have several steps involved.  We have even come across several new combinations of food just because we have certain things cooked in the freezer and just combine them in a pan with some different seasonings.

hope you enjoy, and happy cooking!


Thursday, February 9, 2012

Tomato Sauce

We use lots of tomatoes around here.  We thought we'd give you a short post about how to turn those diced tomatoes into tomato sauce.
I usually use about 1 kg of tomatoes and get about 1 1/2 cups of sauce.
First, blanch, slice, and seed the tomatoes
This is done by slicing an X on the top and bottom of the tomatoes(just through the skin) then dropping them into boiling water until the peeling just begins to lift off of the tomato around your cuts(between 10-30 seconds). Next, immediately remove the tomatoes from the boiling water and drop into ice water to stop the cooking process.  Now the skin should peel right off possibly without the help of a knife leaving the flesh of the tomato for you. I normally slice the tomatoes along the previous X into 4 pieces.  I then cut out the seed part in the middle- you can either toss this or you can put it in a mesh strainer over a bowl to get the juice without the seeds.  At this point you should have something like this bag of blanched, sliced, and seeded tomatoes on the left.
Place the slices in a skillet with a few tablespoons of Olive Oil.
I generally start this cooking with both the olive oil and
tomatoes cold and let them heat up together.


Cover and cook over low/medium heat.
Stir occasionally and let the tomatoes cook down.
Transfer to a bowl or jar and set aside.  Note:  this doesn't keep long, so only make it a day or two in advance.

Apple Cider


I hate apple cider.  I absolutely hate it.  I do not like it on a train, I do not like it in the rain.  I do not like apple cider, Melanie I am.  I always hated the tart spiciness of the cider... UNTIL...I made it myself.  Now, I'm in love.

Here's how I made it:
  • Purchase some Cinnamon sticks (ours look more like bark than the cinnamon sticks you'll find in the grocery store--if yours are really cinnamonny, you'll want to use less), whole cloves, and star anise.  You can see all these things floating in the pot (you can just about 2 large Cinnamon sticks or 3 small, 3 whole star anise, and around 4 whole cloves for the entire process.
  • You'll also need to buy 100% apple juice.  Expect for half of it to evaporate.
  • Add the apple juice, and bring it to a boil.  Then, reduce the heat and let it simmer uncovered until it tastes the way you want it to.  (For me, it was that point when it stopped tasting like apple juice, and I could start tasting the spices.)
  • Serve it up immediately, and then add more juice so you'll have more made in time for refills. 

Oreo Truffles

To prepare for our English Club Christmas party, I decided to tackle truffle balls.  Thanks to an idea from our country director on cream cheese substitutes, they turned out great.  Here's how I made them:

 Thanks to Ira's mom, we received a huge box of Oreo cookies.  You'll need 16.6 ounces of oreo cookies.  6 cookies make two ounces, so you can do the math.  :)


Next, slowly add the cookies to a bag and crush them.  I used a meat hammer, but you can also use a food processor.


 Instead of cream cheese, I used 8 ounces of processed cow's cheese.  It was a LOT cheaper than having to pay for a taxi, go to "Sam's Club," and pay for extremely overpriced Philadelphia Cream Cheese.


When you live in a small space, you have to learn to share.  Here Ira is preparing dinner on one side of the table, while I'm making Oreo truffles on the other.


Mix three cups of oreo crumbs with the cheese.  (You can use the remaining crumbs to sprinkle over the finished truffles, but I didn't bother.)


When the batter looks about like this, roll them it into balls.  I went for 1'' in diameter, but they can be larger.
 I found REAL German chocolate "almond bark" at the Western import store (which, incidentally, did NOT have cream cheese).  I wanted to make my own chocolate coating from cocoa powder, but I found these one Sunday after church and decided to save myself some pain.

It helps to refrigerator the Oreo balls for a while so they hold their shape during dipping: then melt, dip, and store.  We kept our finished balls in the refrigerator on a cookie sheet until they had set.  After that, we transferred them to a plastic bag.
 I never quite got the hang of the dipping process...  I gave up after the white chocolate and let Ira dip the chocolate ones.  They turned out a lot better.  A word of warning, if you are a perfectionist like me, let someone else do the dipping--you'll ruin them in the process of trying to make them look perfect.  :)