Thursday, February 9, 2012

Tomato Sauce

We use lots of tomatoes around here.  We thought we'd give you a short post about how to turn those diced tomatoes into tomato sauce.
I usually use about 1 kg of tomatoes and get about 1 1/2 cups of sauce.
First, blanch, slice, and seed the tomatoes
This is done by slicing an X on the top and bottom of the tomatoes(just through the skin) then dropping them into boiling water until the peeling just begins to lift off of the tomato around your cuts(between 10-30 seconds). Next, immediately remove the tomatoes from the boiling water and drop into ice water to stop the cooking process.  Now the skin should peel right off possibly without the help of a knife leaving the flesh of the tomato for you. I normally slice the tomatoes along the previous X into 4 pieces.  I then cut out the seed part in the middle- you can either toss this or you can put it in a mesh strainer over a bowl to get the juice without the seeds.  At this point you should have something like this bag of blanched, sliced, and seeded tomatoes on the left.
Place the slices in a skillet with a few tablespoons of Olive Oil.
I generally start this cooking with both the olive oil and
tomatoes cold and let them heat up together.


Cover and cook over low/medium heat.
Stir occasionally and let the tomatoes cook down.
Transfer to a bowl or jar and set aside.  Note:  this doesn't keep long, so only make it a day or two in advance.

Apple Cider


I hate apple cider.  I absolutely hate it.  I do not like it on a train, I do not like it in the rain.  I do not like apple cider, Melanie I am.  I always hated the tart spiciness of the cider... UNTIL...I made it myself.  Now, I'm in love.

Here's how I made it:
  • Purchase some Cinnamon sticks (ours look more like bark than the cinnamon sticks you'll find in the grocery store--if yours are really cinnamonny, you'll want to use less), whole cloves, and star anise.  You can see all these things floating in the pot (you can just about 2 large Cinnamon sticks or 3 small, 3 whole star anise, and around 4 whole cloves for the entire process.
  • You'll also need to buy 100% apple juice.  Expect for half of it to evaporate.
  • Add the apple juice, and bring it to a boil.  Then, reduce the heat and let it simmer uncovered until it tastes the way you want it to.  (For me, it was that point when it stopped tasting like apple juice, and I could start tasting the spices.)
  • Serve it up immediately, and then add more juice so you'll have more made in time for refills. 

Oreo Truffles

To prepare for our English Club Christmas party, I decided to tackle truffle balls.  Thanks to an idea from our country director on cream cheese substitutes, they turned out great.  Here's how I made them:

 Thanks to Ira's mom, we received a huge box of Oreo cookies.  You'll need 16.6 ounces of oreo cookies.  6 cookies make two ounces, so you can do the math.  :)


Next, slowly add the cookies to a bag and crush them.  I used a meat hammer, but you can also use a food processor.


 Instead of cream cheese, I used 8 ounces of processed cow's cheese.  It was a LOT cheaper than having to pay for a taxi, go to "Sam's Club," and pay for extremely overpriced Philadelphia Cream Cheese.


When you live in a small space, you have to learn to share.  Here Ira is preparing dinner on one side of the table, while I'm making Oreo truffles on the other.


Mix three cups of oreo crumbs with the cheese.  (You can use the remaining crumbs to sprinkle over the finished truffles, but I didn't bother.)


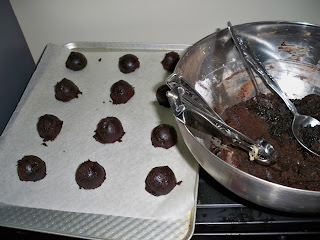
When the batter looks about like this, roll them it into balls.  I went for 1'' in diameter, but they can be larger.
 I found REAL German chocolate "almond bark" at the Western import store (which, incidentally, did NOT have cream cheese).  I wanted to make my own chocolate coating from cocoa powder, but I found these one Sunday after church and decided to save myself some pain.

It helps to refrigerator the Oreo balls for a while so they hold their shape during dipping: then melt, dip, and store.  We kept our finished balls in the refrigerator on a cookie sheet until they had set.  After that, we transferred them to a plastic bag.
 I never quite got the hang of the dipping process...  I gave up after the white chocolate and let Ira dip the chocolate ones.  They turned out a lot better.  A word of warning, if you are a perfectionist like me, let someone else do the dipping--you'll ruin them in the process of trying to make them look perfect.  :)

Pumpkin Pie

Yes folks, this is a pumpkin.  Really, I promise.  1kg of pumpkin.
Pumpkins here in Vietnam are a little strange looking.  This is actually a section of the pumpkin.  I was skeptical about the taste when I discovered that pumpkins existed here, but quickly discovered that it tastes exactly the same as Libby's canned pumpkin!  (Whew!)

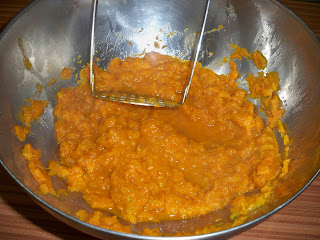
First, steam the pumpkin until it's super soft (around 45 minutes), then mash them with a potato masher.  You can also puree them.  This recipe calls for two cups of mashed pumpkin, but I didn't even measure and the pie tasted great!

Now add 1/2 a teaspoon of salt.
You'll also need 1 2/3 cups of evaporated milk.  This can contained just the right amount, and I was lucky to find it at a big store similar to Sam's Club.

  Next, add two beaten eggs, 3/4 cups of sugar, 1 tablespoon of oil, and 2 teaspoons of cinnamon.  (I was a bit short on spices and actually think pumpkin pie with nutmeg and ginger is pretty terrible, so I always just double the cinnamon.)  YUM!
I know, I know--the pie crust looks pretty terrible.  This is what happens when you can't find another round pie pan (because I also made the pecan pie that you'll read about it my next post) and when you're the buy-your-crust-in-the-freezer-section-of-Walmart kind of girl.

  My pie crust recipe needed butter, but butter is around $8 a pound, so I used oil--resulting in something that tasted like baked flour.  (BUT, it did the job.  No, I won't share the recipe because I'm sure you can do better!)

Bake it at 375 (190 C) for about 1 hour.  I discovered while baking this that my poor little oven does NOT apparently have a temperature regulator and my oven thermometer reported temperatures up to 450, which I'm not sure was an accurate reading, since the pie took about two hours to cook.  In the end, even though the pie looked kind of funny, it tasted sooo delicious! A late Happy Thanksgiving to everyone!

Chocolate Bites


Chocolate Bites:
1 1/4 cups of oil (canola works fine)
2 cups of sugar (I used sugar in the raw)
2 eggs
2 teaspoons of vanilla
2 cups of flour
3/4 cup cocoa powder (I might have used a little more)
1 teaspoon of baking soda
1/2 teaspoon of salt

I used oil instead of butter since butter costs a small fortune here.  I ignored the vanilla since it's only available at really expensive Western import stores.

I suspect these would be even better with chocolate chunks or melted chocolate drizzled over top, poured over it, or dusted with powdered sugar.

Trouble spots:  telling when it's done.  It goes from goo to gone pretty quickly.  You'll need to use your fingers to tell if they are setting.  Use a small ice cream scoop (or teaspoon) to drop onto a cookie sheet.  I always cover mine with parchment paper.  Bake at 350F for 8-10 minutes until the edges begin to set.  The centers may crack slightly.  Don't be afraid to take them out even if they still feel like dough in the middle!  Enjoy!

The Great Tortilla Experiment

So what do you do when you are a person who grew up in the southern USA and are accustomed to all types of wonderful tasting food that just is not mimicked well here in Hanoi?

This is a question I came across recently as I was craving Mexican food and we decided to order out at this "Mexican" restaurant. Well our burrito and quesadilla arrived about 1 hour later with soggy tortillas and I had to wonder "Is there a better way?"

So my mind was set on a quest to create from scratch "good" tortillas. (At this point I have to admit that I miss the ease of Wal-Mart inexpressibly even with all of the swearing the place off after finishing working there during college)

I found a recipe in the Wycliffe International Cookbook which looked promising:

So with a quick glance over of the recipe- I was off in search of ingredients to put these "perfect tortillas together.

The recipe began by putting all of the dry ingredients together.

With the outrageous cost of butter/dairy products I decided to use oil I bought in the market for the 6 Tablespoons mentioned. (note to self: do not buy the cheapest oil- it smells like fish- eww)


This is the beautiful dry ingredients with the oil poured directly in the center... ain't it purty? lol


Now came the fun of kneading the dough(at which point I am missing my old bread machine). Lots of arm exercise.


After kneading the dough came rolling it into balls the size of an egg(the difference in size between the balls is because eggs come in different sizes, not because I was being less than precise ;-) lol. Then they had to rest for 15 minutes. This was no big deal because by the time I finished rolling them the ones I started with had been sitting for 15 minutes already- onward to next step!


Finally they were rolled out to tortilla thickness and cooked on a clean dry skillet for a couple minutes on each side.


After the job was completed they look like real tortillas and I was thinking it would be kinda cool to have a mexican food night with students, but they are also more solid than they should be or should I say stiff. They tasted ok, but not soft enough to roll them into burritos. Anyone have any suggestions?

Chocolate Chip Cookies

Baking is an easy way to show hospitality here in Hanoi, and chocolate chip cookies are an easy student favorite to make.  I'm sure you all are familiar with at least one good chocolate chip cookie recipe, so I won't rehash the ingredients and measurements.

As many of you know, baking is NOT a flexible endeavor...one must be precise and too many substitutions can ruin a good recipe, so the first thing I learned when we arrived here is get it when you see it!!!  (Brown sugar was no where to be found when we first arrived, then later in the summer we discovered an abundance of it at a Western food store and decided to wait--it was gone a few weeks later.)  The second thing we learned is to pick your battles--one battle we chose NOT to fight was the expense of brown sugar...you just can't make chocolate chip cookies without it!  Chocolate chips, on the other hand cost at LEAST $5 (USD) for a small bag.  No.can.do.


Instead, we pay around $1.20 for a large chocolate bar, which--incidentally--is at the nearby grocery store.  This way we save money, and can avoid having to traipse all over town to grab a bag of chocolate!


 Since we don't have a microwave, I soften my butter by placing it in the mixing bowl on top of the oven as it's preheating--it works like a charm!


 Don't leave the US without knowing if you can find parchment paper!  Butter is expensive here, so I don't like to use it to grease a cookie sheet.  Luckily, we can occasionally find parchment paper.  On a return trip, I may see about a silicone baking sheet...since this is reusable.


Just for fun--this is my baking station.  I'm getting really talented at NOT spilling the flour!

Chicken Parmigiana

Ira has been waiting patiently for me to make our favorite dish--chicken parmigiana.  We haven't had it since we left the states because I was too afraid or exhausted to cook it here.  Well, today was the day.  With a few modifications and two hours of free time while Ira was in class, I set to work.  Here's how I made it:

1.   Go to the market to grab any ingredients you don't have.  (In my case, tomatoes, garlic, and eggs.)

2.  Blanch the tomatoes (cans of diced tomatoes are hard to come by here in Vietnam, so it's less of a hassle just to do it yourself).  Ira told me later that I did it wrong, so here are the official instructions:  Heat a pot of water to a rolling boil.  On the counter next to it, get a large bowl filled with ice water.  Cut an X in the bottom of the tomatoes and place them into the boiling water for 10-20 seconds, then immediately scoop them out (with a spatula, of course) and put them in the ice water.  If you cook them too long, the tomatoes will turn to mush (mine almost did)!  If you did it somewhat correctly, the tomato skins should peel right off!

 Here's a bowl full of peeled wonderful goodness:


 3.  Next, you'll need to seed the tomatoes.  I do this by cutting them in half lengthwise and then halving the two halves.  :)  You can use a knife to cut out the middle.  It's easier if you keep the seeds somewhat intact, but don't worry if you miss a few!


4.  Next, slice the seeded tomato quarters in half again.  If you have extra, you are well on your way to having a "can" of diced tomatoes for another meal, or you could make tomato sauce (which is about $1.50 for a tiny can here in Vietnam).

Note:  if you are short on time, you can do this step another day and refrigerate it.  If you have kids, they might enjoy helping you peel the tomatoes.


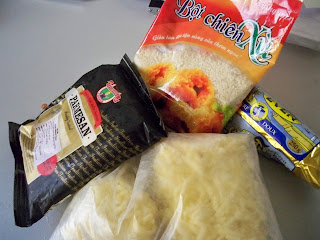
 5.  Round up the essentials!  (Actually, you should make sure these items are available or can be substituted well before you begin cooking!)  I found the bread crumbs at the market--they're at 12 o' clock.  At 6 and 8 o' clock are Parmesan and mozzarella cheese found at a local western food store.  They didn't have price tags and when the clerk rang up the total, it was 425.000đ (that's over 20 USD!!!).  Needless to say, we won't be going back to that store.  At 3 o' clock is the butter (you could technically use oil instead, but I like this better).


 6.  Next, dice 1/2 an onion and a couple cloves of garlic.


 7.  Now it's time to go to the kitchen (our kitchen is outside our apartment).  Add around a tablespoon of butter to a saucepan and saute the onions and garlic.  Add the tomatoes, and a pinch of sugar, salt, and pepper.  I usually dump a good amount of dried basil in also, but you can season it the way you like it.


8.  Set up your chicken-frying workstation.  Bowl #1 (left) is one beaten egg and 2 tablespoons of milk, bowl #2 is 1/3 cup of bread crumbs with a dash of oregano and pepper, along with 3-4 tablespoons of Parmesan cheese.  Hammer the chicken flat before you bread it.


 9.  Fry the chicken in a thick frying pan and/or the lowest heat setting you can manage with your gas range.  If you are lucky enough to have an electric burner, set it on medium and be sure to give the oil enough time to heat up.  I think oil olive has a better flavor, but we're were out.  :(  The lady at the market didn't want to slaughter a whole chicken so we could have chicken breasts, so she offered to debone the leg and thigh meat of another bird that had already been parceled out.  Anything to avoid the supermarket!  (Think Walmart on black Friday without the lines.)

10.  Heat the tomato mixture back up to boiling (the other burner stopped working so I had to wait for the chicken to finish).  If you're not picky about your tomato/marinara sauce, you can always buy it from the store (you'll pay a lot less if you do this in the states, but if you do it here in Vietnam, you'd better know in advance that it tastes good! $$$$)


11. Flip the chicken.  This is about the color you should expect on the breading.  I usually cut in the middle to make sure it's done (not pretty, but hey, I don't have a microwave)!


12.  Place the chicken on a plate, add the tomato mixture.  Sprinkle Parmesan and mozzarella cheese over the tomato mixture.  Eat it while it's hot!  (If you are lucky enough to have a microwave, I'd wait until after I placed the cheese on top to nuke it...melted cheese is ALWAYS better.)  If you are worried about presentation, you may want to drain the tomato juice